This website stores cookies on your computer. These cookies are used to collect information about how you interact with our website and allow us to remember you. We use this information in order to improve and customize your browsing experience and for analytics and metrics about our visitors both on this website and other media.
Blog
10 Steps to Create a WordPress Website
Choose a Domain Name: This is the web address that guides customers to your business. Picking the right domain might seem challenging, but you can simplify it by conducting a domain search on name.com to find an available one, for example www.businessname.com.
Opt for the (.com) extension for your website, also known as the top-level domain (TLD).
Now, where will your website live? Typically, websites are hosted on a cloud server, with an annual cost around $200. Hosting involves storing files and managing DNS records (like A, TXT, CNAME, and more), essentially enabling your domain to point to your website.
Look for a hosting provider that includes features like backups, free SSL certificates, and a user-friendly interface. If a provider doesn’t offer these or makes the process complex, consider using Cloudways for your business.
When choosing a domain extension, go for a Top Level Domain (TLD) like .com, .org, .co, or .net.
To set up your website, download WordPress from the “Plugins” sidebar after logging into the backend of your WordPress site. Often, providers like Godaddy and Siteground automatically install WordPress when you begin a hosting service plan.

- Design, Website Design
Domain names can be purchased just about anywhere like Google Domains, and Name.com.
On average a domain costs around $10 a year. If you select a domain that is generic the cost could go up as much as $1,000 a year because of the popularity. Most of the time you can add (-) in the middle of a domain for example (www.usa-products.com) to change the value of the domain if it has already been purchased.
Remember to keep a login to the domain provider, you’ll need that when you’re ready to go live with the website.

Here are some features you will want to have on your hosting account.
- FREE SSL certificate (HTTPS) the “S” means it’s secure.
- This is important if you want to sell products and have customers make the purchase on your website
- Google prefers websites if they have SSL certificates, without it your website will look like this (http://www.business-name.com)
- Easy installation for WordPress
- Server Scaling to increase the size of your storage in case you need more storage
- Customer support number is very helpful if your website server crashes, it happens
We prefer using Cloudways for website hosting. Their interface is very user friendly and you can access features quickly like server monitoring and contact support quickly.
Cloudways provides hosting plans starting from $12.00/mo which is very affordable. You can find cheaper hosting plans, but you may get a more technical interface that you will need help from your web developer to set up. You can easily migrate your website if you should find a cheaper host, so you’re never tied to one host plan.
Be careful, agencies like to hold your website and domain hostage if you don’t pay, or if you want to switch web agencies, we’ve seen this before with our clients and it’s a big mess to clear up. We suggest, keep the information in your name to prevent headaches down the road.
In Cloudways, you will start up an “Application” to install WordPress. After, you will receive an email notifying it’s ready. You will be given a temporary domain to build out your website before pointing your domain to the Cloudway IP Address when you’re ready to launch.
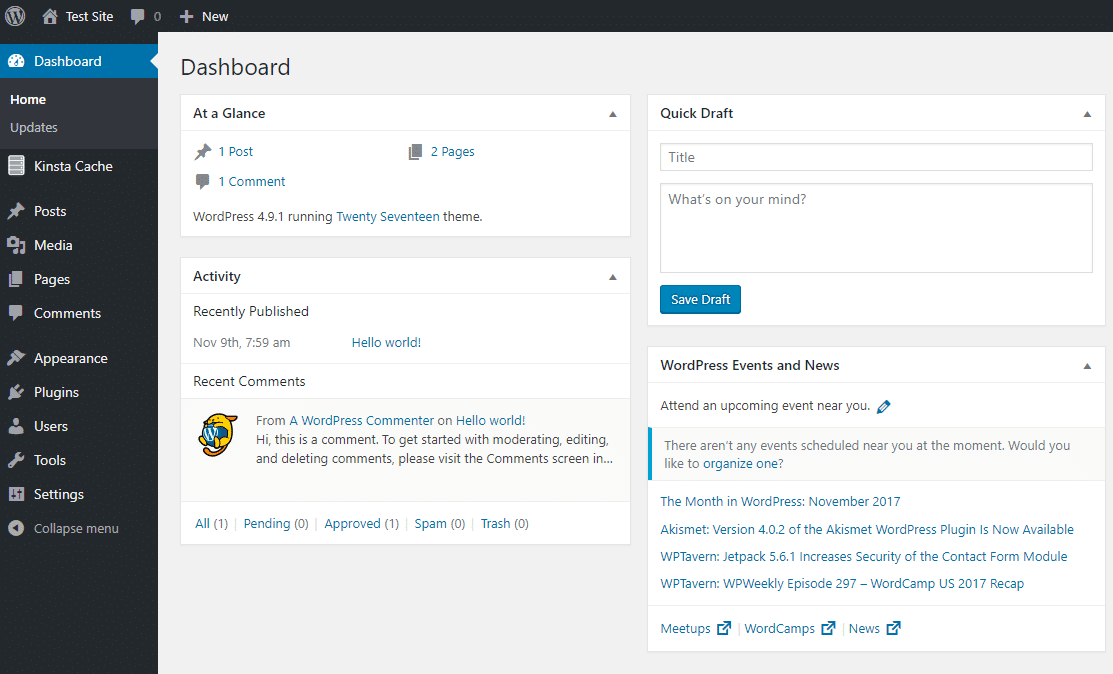
Login into your WordPress URL, which usually is www.temporary-domain.com/wp-admin. The wp-admin is the default URL to login into the backend. We talk about this in step # about how to change the “wp-admin” to a different name to protect you from users trying to hack into your website.
Once you’re in the backend of WordPress, which looks like this.
You will want to select a theme. The theme downloadable plugin to install a design style and functionality of your WordPress theme. Some are free, others are around $50 that come with pages already created for you. The downside is some themes are large file sizes that use up your space on your host, and each theme is different from the next. We suggest using the OceanWP theme. It’s a popular theme that is easy to understand, without all the clutter of features you won’t use.
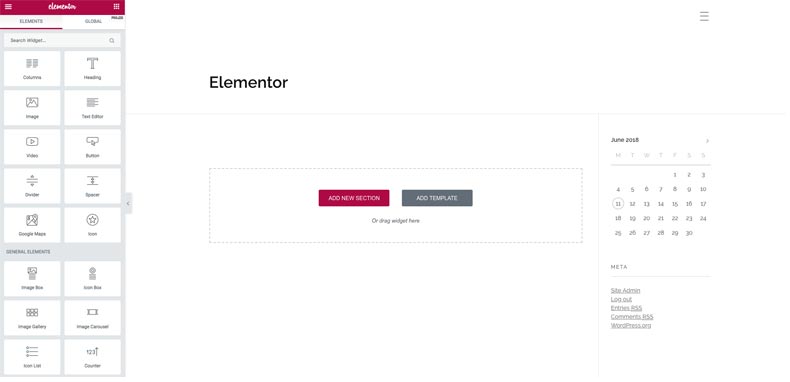
The Elementor page builder is a revolutionary web page builder to bring the front-end design to easily let you edit your website with only one screen at a time. The Elementor page builder is an easy and user friendly drag-and-drop builder without the need of knowing code, like HTML and CSS. You can easily make changes to images, text, add rows and columns, which can be difficult for other WordPress themes. Oh yeah! Did we also mention the basic version is FREE. Try it for yourself.
Elementor is a state-of-the-art WordPress builder that makes designing fun again, and easy for beginners to make changes without a hassle. Yes, practice makes perfect, but I have been designing WordPress websites for 8 years and Elementor has completely changed the way I design, and has made it easier for my clients to make edits on their own.

Everybody wants to explain their product and service on a website but we ship what you should be really paying attention to is what the customer needs are and how you want them to interact with your website. Think about an emotional reason why your customer should buy your product, what is the end result? Now, translate that into a powerful headline. and how you can leverage headlines at the top and above the fold of your website to get the point across to them right away. Sometimes it’s easier said than done but there’s lots of good reading material out there to help businesses small and big make good decisions and improve their copywriting skills to create stunning headlines.
To create an outstanding homepage design, we need to include these 3 main bullets to increase readability and user experience.
- Choose an emotional engaging image that will take up the whole screen or 50% of the top of the page.
- Craft a headline to place over your image, but keep a balanced layout with the content to the left or right of the main image. This helps your customers focus on the image and quickly read your headline for high conversion results.
- Include a contact form with a name, phone, email fields to let users fill out quickly.
- Lastly, include your VP or client testimonial to really drive home your valuable service qualifications.

UX or user-experience is the action of users interacting with elements on your website such as clicking buttons, scrolling, watching videos, and behavioral flow going from page to page. Why is this important you ask? It’s what makes your website engaging for users to stay on the page instead of leaving if they become disinterested. Colors, font choices, spacing, and navigation are all parts of your UX experience.
A good way to measure this metric is installing Google Analytics on the website. GA for short, will measure the length of time an user stays on page, or bounces off meaning there could be something wrong with your web page. Also, GA can track Google Ads, referral links, and social media interactions. These are crucial areas to measure on a weekly basis and will give you the advantage to see how your users or customers interact with your website. Another trending tool to use is Hotjar, it’s a heatmap for your website to track user clicks and % scrolling.

SEO is by far the most important feature of your website to get customer traffic to your website by searching. A good place to start is looking at your “Alt Titles” for each image on your website. You can find the Alt Titles in your media folder in WordPress. Create a title for each image and include a valuable keyword within the title. If you are creating recipes for a cookbook and have a picture of a chicken pot pie, create a title with for example “The Best Chicken Pot Pie Recipe for Dinner”. This tells Google what your blog is about and if a person searches for a chicken pot pie recipe, your chances of your picture and page showing up increases. Yes, you’ll need to be building your recipe content out to stand out to Google, but this is how you get organic traffic.
Another important area to include SEO is on each page of your website – On-Page SEO. This includes the following.
- URL Structure
- Anchor Links
- HTML Tags
- Keyword Density
- Internal Linking
- Page Titles
- Meta Descriptions
- Image Alt Titles
Secondly, there is Off-Page SEO. This is just as important as On-Page, because it’s connecting potential customers from outside websites or directories that include your website link. Google loves Off-Page SEO and is typically called Backlinks. Backlinks include:
- Links Building
- Social Media Channels
- Brand Mentions
- Directory Listing
- Image/Video Sharing
- Guest Posts
- Email Referrals
There isn’t a golden bullet to target all of these areas, but we can say it takes about 60-90 days to start seeing traffic from your efforts. If there is one thing we can tell you to do to speed up your lead generation it starts creating content now. Most SEO agencies will promote they have the secret to doing this fast, unfortunately, that isn’t true. It cost thousands of dollars to increase your On-Page and Off-Page SEO results by buying your way into the game. But if there’s one thing we learned, no one is going to be able to write better and more accurately about your business and services than you. It might take a little time and practice to start nailing down your value proposition, but we promise you’ll be shaving time and most importantly your money. With funding so tight these days, you’re better off starting a couple of posts each week, and before you know it, you will have created some solid articles to gain traction.
We’ll we be talking more about SEO in the next blog articles because it’s the most valuable part of your website.
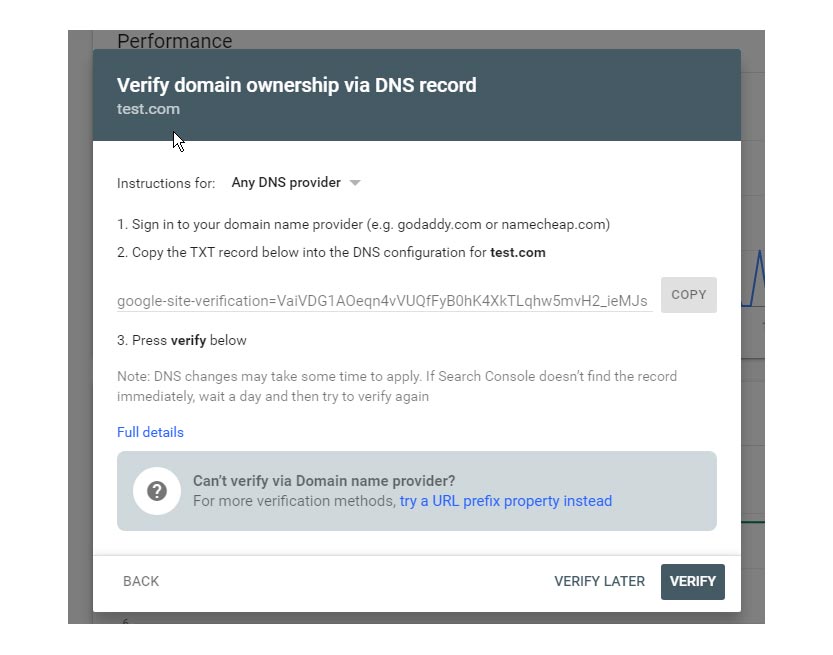
Follow these steps to set up your Google Search Console profile. Search Console delivers important search traffic reports, performance, crawling issues, and positions your website to show up on search results – this is huge, don’t forget it. Here’s a quick instruction list on how to install.
- Add a property

2. Add the domain name, and click continue.
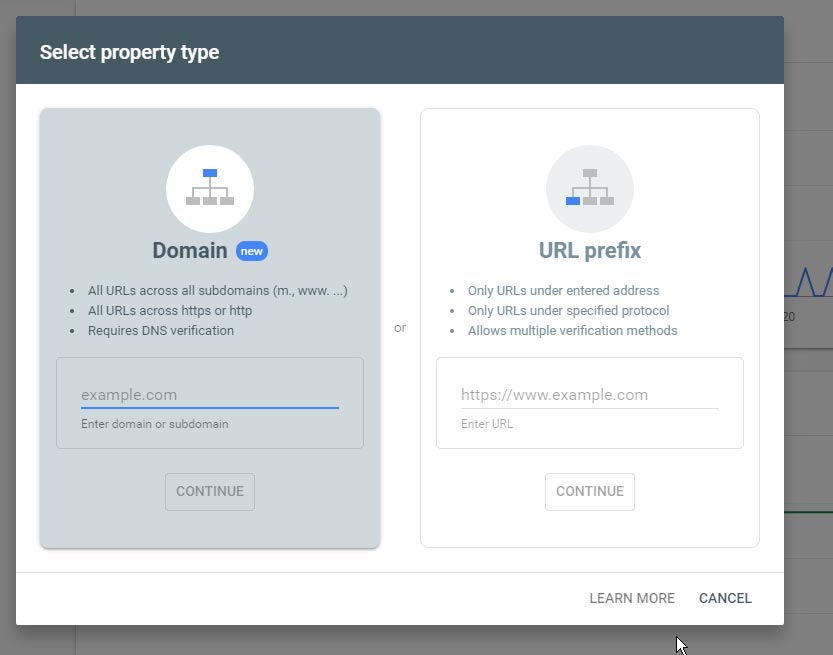
3. Select and copy the TXT Record and create a new TXT Record in your DNS settings, and click verify later. It may take a couple hours depending on what TTL you input, so check back in your Search Console account to verify.

Congratulations on launching your new website. However, the work isn’t done, it’s a good idea to revise content on your website every few months so Google will pay attention to content updates and reward you by increasing your page search results. Like other websites that have content writers it’s a good idea to write content often by adding new blog posts about your services, trending topics, helpful tips, or referencing other articles.
Remember to step back and think outside the box for creating your next blog article. Try reaching out to co-authors who write about your blog, this is a great tip for increasing traffic to your website. There’s other improvements you can make, so give a good search on SEO and article writing tips, there’s a load of content and tips out there.
